
Your kitchen drawers are full — but somehow nothing is ever where you need it.
You open three cabinets to find one pan lid. You dig through a tangle of utensils just to grab a spatula. And after cooking, putting things “away” means stuffing them back into whatever space is left.
This is not a space problem. This is an organisational problem — and it is completely fixable without renovating a single wall.
This guide shows you exactly how to organise a small kitchen so every tool has one job and one home. You will learn how to declutter, zone your workspace, and set up a simple system that actually stays organised — even in the smallest apartment kitchen.
Small kitchen organization works best when you reduce what you own and assign every remaining tool a fixed location. This guide walks you through a five-step system — from decluttering to zoning to storage — that works in any kitchen size, including studio apartments and rental units. No major renovation required. Budget: $20–$60.
Why Small Kitchens Feel More Cluttered Than They Are
Most small kitchens are not actually short on storage. They are short on decisions.
When tools have no fixed home, they pile up on counters, jam drawers, and overflow cabinets. Every cooking session becomes a minor search operation. According to organisation experts at Family Handyman, the most common kitchen problem is not lack of space — it is duplicate tools and no storage system.
The solution is to own less and organise what remains with clear rules.
What You’ll Need Before You Start
Keep costs low. Most of these items are available at any home goods store or online for under $60 total.
| Item | Purpose | Est. Cost |
|---|---|---|
| Drawer dividers (adjustable) | Separate utensils by type | $8–$15 |
| Utensil crock or holder | Countertop tool storage | $10–$20 |
| Vertical lid organiser | Stop lid pile-up in cabinets | $8–$12 |
| Magnetic knife strip | Wall-mounted knife storage | $15–$25 |
| Tension rod (adjustable) | Inside-cabinet vertical storage or under-sink hanging | $9–$15 |
| Clear shelf bins (stackable) | Pantry and cabinet grouping | $10–$18 |
| Stackable containers (matching lids) | Food and leftover storage | $15–$25 |
Total estimated budget: $20–$60, depending on what you already have.
Step-by-Step: How to Organise a Small Kitchen
Step 1 — Pull Everything Out First (Time: 30–45 min)
Do not organise inside the drawers. Pull everything out completely.
Lay all utensils, tools, gadgets, and containers on your kitchen table or counter. This is the most important step — and the one most people skip.
Why it matters: You cannot see the full scope of the problem until everything is visible at once. Most people are surprised to find they own 3–5 duplicates of common tools.
Once everything is out, wipe down the empty drawers and shelves before putting anything back.
Step 2 — Sort Into Three Clear Groups (Time: 20–30 min)
With everything visible, divide your tools into three piles:
- Keep — Used at least once per week
- Remove — Duplicates, broken, or untouched for 3+ months
- Unsure — Box these separately for a 30-day test
A useful test before you keep something: ask what task it handles that you actually do. If you do not bake, you do not need baking tools gathering dust. If you never entertain, extra serving dishes do not belong in your kitchen. Keep tools that match your real cooking habits — not an imagined version of how you cook.
A practical tip from This Old House: most home kitchens hold 35–50% more tools than the household actually uses. Be honest with this step. You do not need four wooden spoons.
Common items to remove:
- Duplicate spatulas and spoons (keep 1 large + 1 small of each)
- Single-use gadgets (avocado slicers, strawberry hullers, egg separators)
- Mismatched lids with no container
- Cracked or warped cutting boards
Step 3 — Assign Activity Zones to Your Kitchen (Time: 15 min)
Every zone holds only what belongs to that activity. Think of your kitchen as five separate workstations, each with its own tools and nothing else.
The Five Core Kitchen Zones:
Prep Zone (near cutting board area) → Chef’s knife, paring knife, cutting board, peeler, grater, kitchen shears
Cooking Zone (near stove) → Pans, pots, spatulas, wooden spoon, ladle, tongs, spice jars (on a magnetic strip, small rack, or the fridge side)
Drink Zone (near kettle or coffee maker) → Mugs, kettle, coffee tools, teabags
Storage Zone (pantry or lower cabinet) → Food containers, lids, wraps, bags
Clean Zone (near sink) → Dish brush, soap dispenser, drying rack, sponge
A helpful strategy: start by placing the “had tos” first — items that have only one logical spot due to space constraints. For example, if your only deep drawer is next to the sink, that is where your silverware goes. If your corner cabinet is the only one tall enough for pots, that becomes your pot zone. Sorting these fixed-location items first makes the rest of the layout easier.
When you are setting up your drink zone, consider the appliances you use most. A Magic Bullet or NutriBullet used daily for smoothies deserves a dedicated shelf above its base, with cups and lids stored right next to it. If you use a full-size blender only occasionally, keep it in a cabinet and bring it out when needed — counter space is too valuable for weekly-use tools.
Keep each zone tight. If a tool does not belong to the zone, it does not go there — even if the space looks empty.
Step 4 — Give Every Tool One Permanent Home (Time: 30–45 min)
Now, place everything back with intention. This is where the system actually takes shape.
Drawer organization:
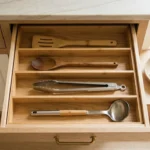
- Use adjustable drawer dividers to create fixed sections
- Group by type: cutting tools in one section, measuring tools in another, small gadgets in a third
- Nothing loose — every section has a clear category
If your cabinets have a double drawer design (common in some modular systems), use the top tier for everyday silverware and the bottom for knives or larger utensils — this doubles your usable space without adding depth.
Countertop:
- One utensil crock near the stove: spatulas, wooden spoon, ladle, tongs
- No more than 2–3 items on the counter at any time
- Mount a wall-mounted paper towel holder on the wall or under an upper cabinet — one less item competing for counter space
- When replacing any small appliance, look for the smallest version that does the job. A compact personal blender stashes in a cabinet when not in use; a full-size blender claims counter space permanently
Knife storage:
- Mount a magnetic knife strip on the wall near your prep zone
- Keep knives off counters and out of drawers — safer for adults and children
- Safety note: Mount the strip at adult eye level, out of reach of children
Pots and pans:
- Stack pots from largest to smallest, one cabinet only
- Use a vertical lid organiser inside the cabinet door to store lids upright
- Alternatively, a tension rod placed vertically inside the cabinet creates a simple slot for lids and cutting boards to stand upright — no drilling required
Pantry or cabinet shelves:
- Use clear, stackable bins to group: baking supplies, canned goods, snacks, oils
- Label each bin — masking tape and a marker work perfectly
- Match your containers: mismatched lids are one of the top causes of cabinet chaos. When buying new, choose a single container system where every lid fits every base
Dead spaces worth using:
- The gap between your stove and the wall: a magnetic shelf across the back of the stove holds salt, pepper, oil, and small spice jars — no drilling, no adhesive
- The side of your fridge facing the kitchen: adhesive hooks or a magnetic strip hold oven mitts, a small whiteboard, or lightweight tools. You can even use strong fridge magnets to hang slim cleaning tools like a Swiffer or a dish brush.
- The inside of cabinet doors: add adhesive hooks for measuring spoons, oven mitts, or small strainers. This is one of the most underused storage surfaces in small kitchens.s
Step 5 — Apply the One-Tool-One-Home Rule (Ongoing)
The system only works if everything returns to its exact place after use.
This is not a one-time clean. It is a daily habit. When cooking is done, a five-minute reset puts every tool back in its zone.
The rule is simple: Use it → clean it → return it.
If something does not have a home, you either find it one or remove it from the kitchen.
Small Kitchen Organisation for Renters and Apartments
If you rent and cannot drill into walls, the same system still applies — just with freestanding solutions:
- Tension rods: Place one under the sink to hang spray bottles and cleaning cloths. Place one horizontally inside a cabinet to create a vertical divider for lids, trays, or cutting boards. Costs under $10 and requires zero wall damage.
- Slim rolling cart: A narrow wheeled cart fits in the gap between your fridge and the wall or beside the stove. Use it as a mobile pantry for canned goods, spices, or a dedicated coffee station.
- Over-the-sink shelf: Adds usable horizontal space without wall damage
- Stackable shelf risers: Double the usable depth inside a cabinet
- Adhesive hooks on cabinet interior walls: Hold light tools, oven mitts, or measuring cups
- Roll-up dish rack: Dries dishes and then rolls away for storage — ideal when permanent drying racks take up too much counter space
According to wikiHow’s kitchen organisation guides, renters consistently underuse the inside of cabinet doors — one of the highest-value storage surfaces in any small kitchen.
Common DIY Mistakes to Avoid
Organising before decluttering. Sorting clutter into bins is not organisation — it is relocation. Always remove duplicates and unused items before placing anything back.
Buying storage products first. Most people buy drawer organisers that do not fit. Measure your drawer dimensions before purchasing. Standard adjustable dividers work in most 18–24-inch wide drawers.
Ignoring vertical space. Walls, the inside of cabinet doors, and the space above the refrigerator are all usable. Small hooks and mounted racks cost under $10 and add significant storage.
Creating a system too complicated to maintain. If returning something takes more than three seconds, the system will fail within a week. Every storage decision should make putting things back easier, not harder.
Mixing zones. Storing a cutting board in the cooking zone instead of the prep zone sounds minor — but over time, mixed zones create confusion and clutter returns.
Pro Tips for a More Functional Small Kitchen
- Store by frequency: Daily tools at arm height. Weekly tools at shoulder height. Monthly tools at the top. Keep a folding step stool nearby so high shelves remain practical — not decorative dead zones.
- One in, one out rule: Every time you bring a new kitchen tool home, remove one. This keeps the system balanced.
- Use stackable containers with matching lids only. Mismatched containers are one of the top causes of cabinet chaos.
- Do a monthly 10-minute reset. Open every drawer and cabinet once a month and return anything that has drifted from its zone.
- Invest in fewer, better tools. A good chef’s knife replaces five gadgets. The same principle applies to larger appliances — choose compact versions that store in a cabinet rather than on the counter. The fewer items competing for surface space, the easier the system is to maintain.
- Use nearby spaces for overflow. If your kitchen is genuinely at capacity, move rarely-used items to the nearest storage surface outside it — a dining room sideboard, a hallway cupboard, or a shelf near the kitchen entrance. Extra serving dishes, backup supplies, and seasonal items do not need to live inside the kitchen.
- When choosing organisers, think long-term. Opt for items that will work in your next kitchen too — not just the current one. A well-made magnetic strip or a sturdy set of drawer dividers will serve you for years, even if your space changes.
Before & After: A Real-Life Example
Before: A 110 sq ft galley kitchen in a two-bedroom apartment. Four drawers stuffed with mixed utensils, three pans with no lids, duplicate measuring cups, and a countertop covered with rarely-used appliances. Cooking took 5–10 extra minutes per session, just in locating tools.
After: Same kitchen, same cabinets. Removed 40% of tools (donated or discarded). Installed drawer dividers ($12), a magnetic knife strip ($18), a tension rod inside the pots-and-pans cabinet ($10), and a utensil crock ($14). Five activity zones mapped out. Cooking time reduced. Counter fully cleared except for the coffee maker and one utensil crock.
Total cost of transformation: $54.
FAQs
What is the best way to organise kitchen drawers in a small kitchen?
Use adjustable drawer dividers to create fixed sections — one for cutting tools, one for measuring tools, one for small gadgets. Remove duplicates first, so you are not organising excess.
How do I organise a small kitchen with no counter space?
Clear the counter completely first. Keep only what you use daily on the surface (coffee maker, utensil crock, one cutting board). Everything else goes in a cabinet or drawer. Wall-mounted paper towel holders, magnetic knife strips, and over-door storage add space without using the countertop.
How do I stop my kitchen from getting cluttered again?
Use the one-in-one-out rule and a five-minute daily reset. When every tool has a fixed home, maintenance takes minutes — not hours.
What kitchen tools can I get rid of right now?
Start with duplicate spoons and spatulas, single-use gadgets, mismatched containers, cracked boards, and any appliance you have not used in three months.
Is this system renter-friendly?
Yes. All the storage solutions in this guide — drawer dividers, utensil crocks, tension rods, over-door organisers, slim rolling carts, shelf risers, roll-up dish racks, and adhesive hooks — require zero wall drilling and are fully renter-safe.
Final Thought
A small kitchen does not need more space. It needs fewer things and a clearer system.
When every tool has one purpose and one home, cooking becomes faster, calmer, and easier to clean up after. The system is simple to set up and — with a five-minute daily habit — simple to maintain.
Start today. Pull everything out. Remove what does not earn its place. Then put the rest back with intention.
That is all it takes.

Other Articles
How to Organize a Small Kitchen: One Tool, One Place, Zero Clutter
How Loud Power Tools Cause Noise Fatigue — And How to Protect




No Comment! Be the first one.